With the barbell (bent-over) row you train all the major muscles in your back. A compound exercise that belongs in any training program, unless you prefer an alternative but equivalent rowing exercise.
TWO VERSIONS
We know several versions of the barbell row, especially depending on how the upper body is positioned in relation to the floor.
In a strict execution (also called Pendlay rows, after American weightlifting coach Glenn Pendlay), you keep your torso parallel to the floor and bend your knees slightly, starting and ending the exercise with the bar on the floor. Some people experience this strict implementation as uncomfortable. This is usually due to a lack of flexibility in the hamstrings, the muscle group at the back of your legs.
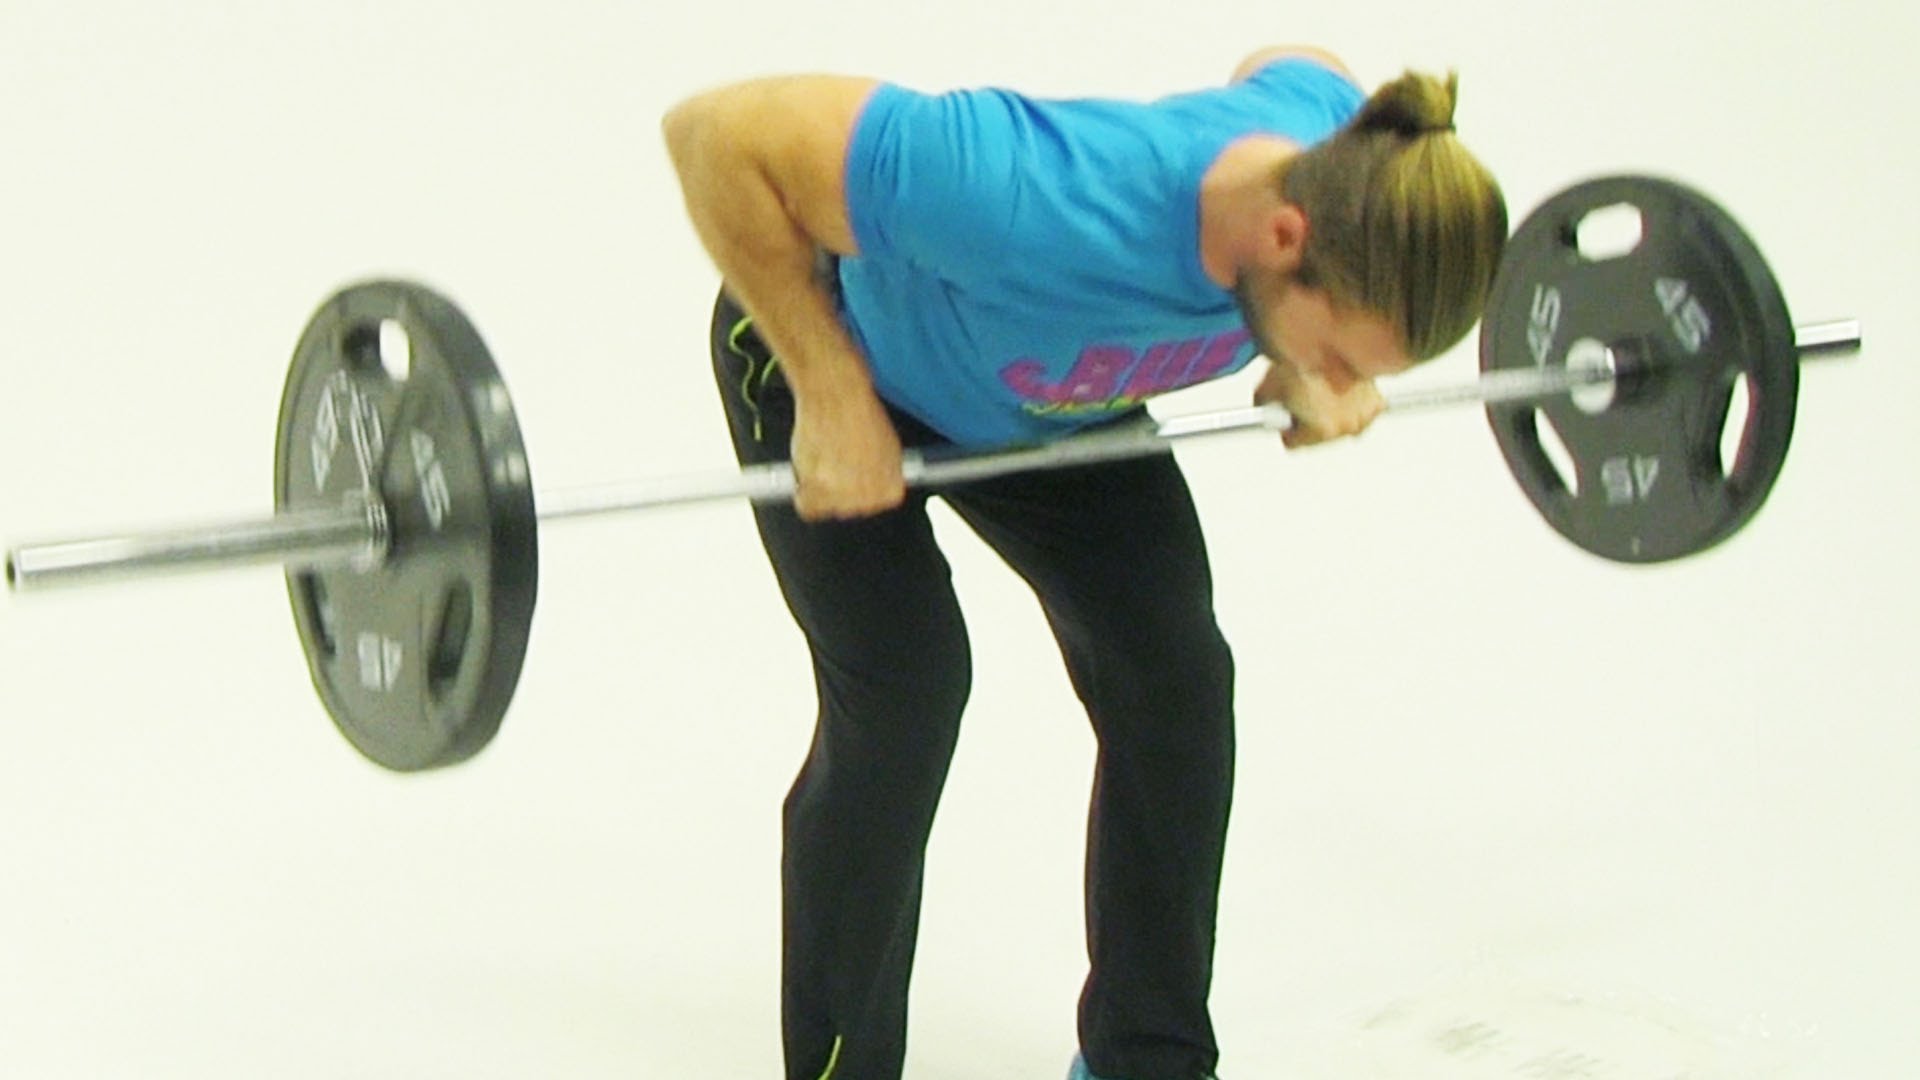 The Pendlay row . (Source: Buff Dudes )
A less strict run will keep your upper body a little more upright, say 15-30 degrees to the floor, but definitely no more than 45 degrees – depending on your flexibility, which can improve over time. This performance results in so-called Yates rows , named after six-time Mr. Olympia Dorian Yates, who did this exercise specifically for his upper back and not for his overall back development!
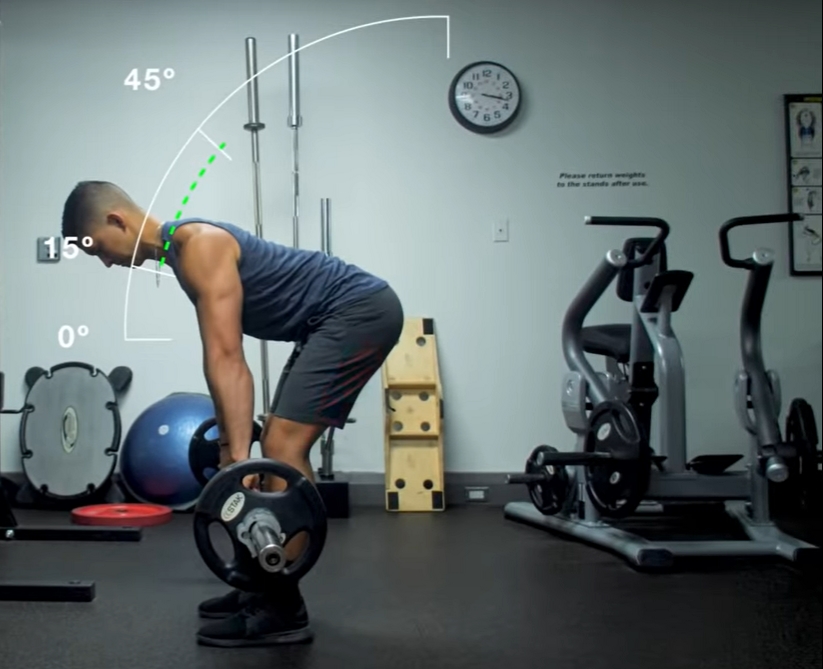 The correct version of the slightly less strict version, aka Yates row, where the upper body is about 15-45 degrees above horizontal. (Source: Jeremy Ethier)
Barbell rows also lend themselves to mechanical drop sets. By increasing the back angle, you can squeeze out a few extra, less heavy, reps.
WHICH OF THE TWO?
Most people do Yates Rows (probably unfamiliar with that name) simply because they lack the flexibility to do the strict Pendlay Rows. The great thing about Pendlay Rows, however, is that you train the middle and bottom of the trapezius a little more with these, a relatively difficult muscle region to train, which is important for creating back thickness.
With Yates Rows you focus a little more on the lats, which are often trained directly with pull-ups and/or -downs. Although you can also emphasize the middle of your back with Yates Rows, especially by adjusting the grip width (see below).
Purely from a hypertrophy point of view, Yates Rows are preferred because you can perform the eccentric (negative) phase in a controlled manner. With Pendlay Rows, the weight falls down, so to speak, so that you miss out on some of the stimulus in the eccentric phase and why this variant is mainly used by weightlifters and less by bodybuilders.
EXECUTION PENDALY ROW
At the Pendlay row, you are bent over enough to lift the barbell straight off the floor. Pull it, explosively, to the bottom of your chest.
 The execution of the Pendlay row. (Source: Buff Dudes )
EXECUTION YATES ROW
The less strict version, the Yates row, starts by lifting the barbell off the floor and then bending forward until the bar is just below your knees. As a result, you basically start the exercise like you start a deadlift: with the bar over your toes and your body in the correct hip position:
 The Yates Row. You ‘deadlift’ the bar a bit off the floor. (Source: Tony Gentilcore, T Nation )
From here, explosively pull the bar toward your waist (between your navel and the bottom of your sternum), moving your elbows as close to your torso as possible. At the end, squeeze your shoulder blades together and lower the bar back to the starting position by extending your arms.
 Pull the bar, explosively, to your waist. (Source: Tony Gentilcore, T Nation )
The advice below relates to the Yates row, unless stated otherwise.
BACK POSITION
The fact that many ignore the barbell row may be because the exercise requires a strong, straight lower back, which is actually trained isometrically, or statically. As with deadlifts, systematically rounding the lower back can lead to injury. Moreover, with a rounded lower back you cannot use your pull muscles optimally and you are therefore less strong in the exercise.
Below you can see what we mean: how not to start the exercise and how to correct it.
If you want to completely spare the lower back when rowing, you should opt for a chest supported variant, such as the ‘cambered bar row’ or the chest supported dumbbell row.
SHOULDER BLADE POSITION
The barbell row is not only meant to build a broad back, but also to build a thick back. After all, the row is the perfect exercise to develop the middle traps and rhomboids, muscles that give you such an impressive ‘alien back’.
To optimally stimulate the mid-range of your upper back, you should slightly lengthen or stretch your shoulder blades at the bottom of the exercises, without rounding your lower back. By extending we mean pulling them slightly forward so that you can then make a maximum contraction. That then looks like this:
RANGE OF MOTION
For maximum muscle growth you must create a maximum stimulus and therefore also a maximum ROM, or stretch. With the barbell row, this means that you let your arms ‘hang’ completely at the bottom, like a dead hang, and that you don’t start your next rep halfway through.
What not to do and how to do it:
Another way to smuggle pieces of ROM is not to touch the belly. The bar should touch your stomach at the top — where exactly, it doesn’t matter that much: touch low, below your navel, you will stimulate the lats a little more (for back width), touch high, more towards your chest, you will stimulate your mid-upper back slightly (for back thickness).
GRIP
Which grip should you use: a standard overhand (pronated) grip or the alternative underhand (supinated) grip? There is something to be said for both.
It’s true that an underhand grip increases the engagement of both your lats and biceps. But on the other hand, rows are not a lat-specific exercise like pull-ups and -downs, but an exercise for overall back development. And our personal experience is that the increased biceps engagement just makes us have to quit a set earlier, because the biceps are fatigued for the back that is. We are therefore in favor of an overhand grip or, if you have a Swiss bar at your disposal, a neutral grip.
With regard to the trapezius, the overhand grip appeals more to the top and the middle and the underhand grip to the bottom. The back of the shoulders (rear delts), finally, are the most active in an overhand grip.
Dumbbell rows bent over are usually performed with an overhand, medium-wide grip. But you can also vary the handle width. The following applies: the narrower your grip, the more your lats are put to work. A narrower grip emphasizes your lats, but limits the involvement of your other back muscles. The reverse is true for a wide grip. Just think: the wider your grip, the more you move your elbows not only toward your body, but also away from it. With an extremely wide grip, you’re pulling the bar toward your chest instead of your waist, especially working the top of your back (traps, rhomboids, and erectors) and back of your shoulders.
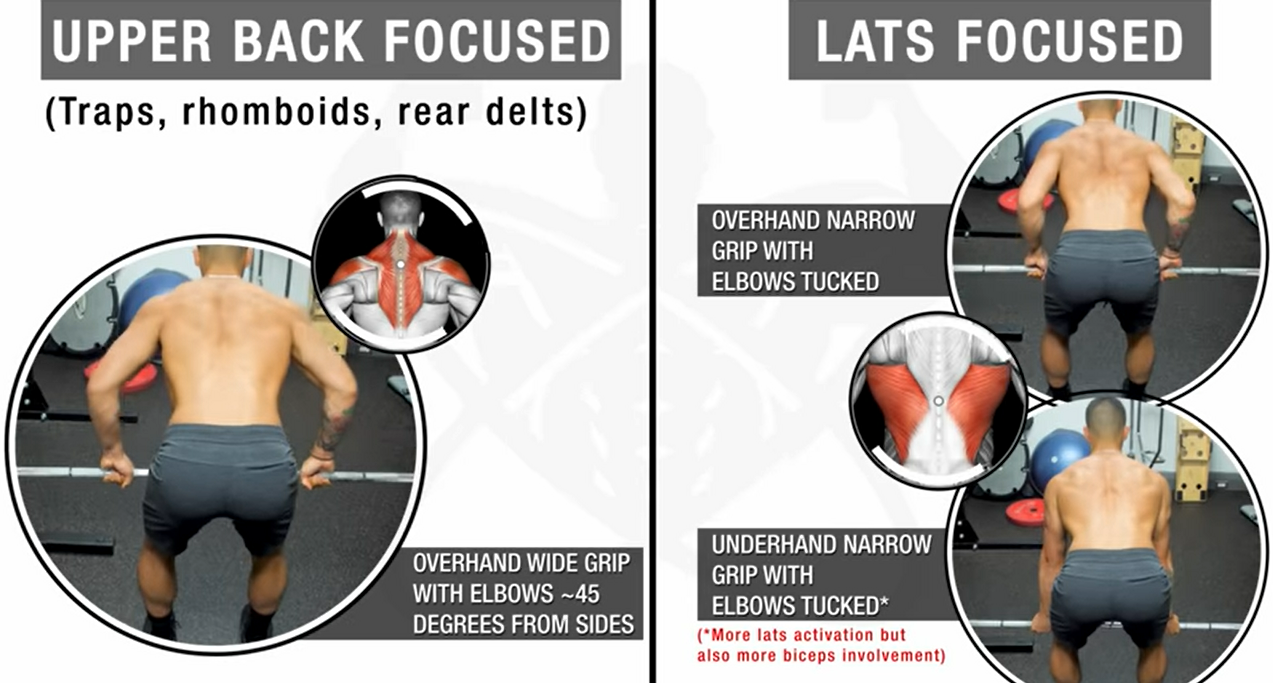 How to focus on a certain part of the back by means of the grip. (Source: Jeremy Ethier )
For overall back development, which is what the exercise is actually intended for, a medium-wide grip is preferred. That is, slightly wider than shoulder width. This way you distribute the attention over your entire back and you involve your lats in the exercise, without ignoring your upper back.
Vary in grip width and notice which muscles you feel working.
‘CHEATING’
For the effectiveness of the exercise it is important to let your arms do the work. By involving your knees or hips in the exercise, you may be able to move more weight, but you are actually fooling yourself. Okay: your back angle may change minimally during the performance, but no more than a few degrees. In short, never hand in technic in favor of more kilos.
There is mainly movement in two joints: your shoulders and elbows. That makes barbell rowing a compound or multi-joint exercise. Barbell rows are therefore not an isolation exercise for your back. (We’re only mentioning it because we heard someone say it once.) After all, you can’t disable your biceps, which bend your arm. However, you can prevent your biceps from taking over too much work at the expense of your back.
A good way to do that is to focus not so much on bending your arms as on moving your elbows back. You then have to ‘forget’ your forearms and wrists. That’s tricky, since you’re holding the bar with your hands. Nevertheless, achieving this so-called mind-muscle connection, as top bodybuilder Kai Greene calls it, is very important.
DUMBBELL ROW BETTER?
Although a (or THE) basic exercise for your back, the barbell row also has some drawbacks. Reason why alternative rowing exercises are sometimes preferred, especially the single-arm dumbbell row.
It’s not that rowing with a dumbbell is necessarily ‘better’ than with a barbell. It depends on how well you are able to make a good hip hinge. In the hip hange, the hip moves back and at the same time the upper body bends forward keeping your back straight and the head in neutral position. A crucial move, which is required of you in most exercises that involve standing on the floor. But even the most experienced strength athletes often struggle with this move, even with just body weight. As a result, it is hardly possible to keep the spine neutral during an exercise with (a lot of) weight on the bar. And that can be dangerous.
In addition, the barbell row puts considerable pressure on your lower back, as we discussed in ‘Back position’. That’s not necessarily wrong, but if your lower back is already having a hard time doing squats, deadlifts and rack pulls, it could be a bit too much of a good thing.
The single-arm dumbbell row thus offers a number of advantages over the barbell row:
- The exercise is safer in principle because no hip hinge is needed;
- The exercise is much less taxing on your lower back;
- You can (partly because of this) use more weight;
- The range of motion is not limited by the bar;
- It is a great exercise to increase your grip strength, something that comes in handy in many exercises.
To spare your lower back, you can also do the aforementioned chest-supported rows.
We like to vary rowing exercises, as you can read in the next section, because each variant has its unique advantages.
PLACE IN YOUR TRAINING SCHEDULE
Rowing moves such as dumbbell rows are an essential component in your back training, in addition to lat-specific exercises such as pull/chin-ups and lat pulldowns. If necessary, you can also add some exercises to your schedule that mainly target the middle of your upper back (the area between the shoulder blades, so to speak).
Also rack pulls and deadlifts train your back, all you need significantly more cautious program if you include the deadlift into your schedule. After all, the exercise causes a very high training load, which makes it questionable whether the costs outweigh the benefits (of course, from a hypertrophy point of view).
For optimal muscle growth in the back, intermediate to advanced bodybuilders usually do 15 to 25 sets per week, where you can best operate in the range of 6 to 15 repetitions.
ALTERNATIVE ROWING EXERCISES
Barbell rows are certainly not the only rowing movement. The T-bar row, single-arm dumbbell row, two-arm dumbbell row, and seated cable row each offer you unique benefits. The discussion about which rowing exercise is the best is mainly a theoretical one. In practice, nothing stands in the way of alternating these exercises.
For example, we like to alternate between barbell rows and T-bar rows with a V-grip, because of the completely different grips and grip widths. This way you get the best of both worlds.
When putting together your training program, make sure that you do not do too many similar exercises. Pay particular attention to grip and grip width, and note that T-bar rows with a V-grip are very similar to seated rows with the same attachment. The difference is just a matter of perspective.