Legendary strongman Jón Páll Sigmarsson once said, “There is no reason to be alive if you can’t do deadlift.” Ironic that he just said that, because he died at age 32… when he was deadlifting — you guessed it.
The “dead” in deadlift, however, does not refer to the fatality of the deadlift, but to the fact that you are pulling a “dead” weight off the floor. This while with the bench press and squat you first have to lower the weight before you press it out. Partly because you cannot take advantage of momentum with the deadlift, the exercise is considered the ultimate strength test.
RECORDS
There’s also no exercise you can do more heavily than the deadlift (besides the unconventional hip lift, perhaps); the majority of professional powerlifters have a stronger deadlift than squat, unless they specialize in the latter part.
The current world record in the deadlift is held at 1,015 lbs by Icelander Benedikt ‘Bennie’ Magusson. That’s 460.5 kilograms. Eddie Hall did deadlift 462.6 kg, but that was in a strongman competition, where unlike in a powerlifting competition you can use wrist straps and they take it a little less closely with the rules.
Incidentally, the world records in the lower weight classes are at least as impressive. The strongest lighter powerlifters deadlifted more than four times their body weight. The heavier guys ‘only’ about two and a half to three times. The lighter powerlifters are therefore relatively (much) stronger.
It is difficult to say exactly how old the barbell deadlift is. The deadlift dates back to the 1950s as a competitive component, but the Ancient Greeks and Romans already trained with barbells.
REVERSE SQUAT?
The barbell deadlift is sometimes referred to as the ‘reverse squat’. That is as understandable as it is wrong. Because while in both the deadlift and squat the work is done by the hips and legs, it happens to different degrees.
The major difference between the deadlift and the squat, unlike the bar position, is that in the squat, your hips move past your knees, while in the deadlift starting position they are above it.
MUSCLE ANALYSIS
The deadlift is a true full-body exercise . In fact, it’s an exercise for your entire posterior chain, or the muscles at the back of your body. The greatest appeal is made to your hip muscles and your lower back (erector spinae), which is trained statically. Your hamstrings also play an important, but questionable role.
Let’s dig a little deeper.
The deadlift uses more or less the same muscles as the squat, but to a different extent. The squat is considered a knee-dominant exercise and the deadlift is a hip-dominant exercise, given the amount of movement in these respective joints.
Your glutes and adductors extend the hips and your quadriceps extend the knees. The hamstrings play a double role. Until the bar passes your knees, the hamstrings only act as stabilizers. Then they will actively help your hips in completing the movement. The role of the hamstrings as an auxiliary muscle is thus limited to the upper half of the exercise.
Your erector spinae, ‘opposed’ by your abs, keeps your spine in a neutral position. This muscle is therefore trained isometrically. Finally, there is a small role for your calves, as there is some movement in your ankle joint.
The day after a heavy deadlift session, your upper back and shoulders can also be quite sore. Your traps and rhomboids actually stabilize your shoulder girdle and your lats (latissimus dorsi) actually keep the bar close to your body. The day after a serious deadlift session, it is therefore better to give both your legs and your back the necessary rest.
Finally, it is striking that the downward phase of the deadlift is different from the upward phase. Lowering the weight is almost purely a hip issue, with barely any bend in the knee joint.
PERFORMANCE
Correct execution of the deadlift not only prevents injuries, but also allows you to perform the exercise as efficiently and effectively as possible. The latter becomes increasingly important as weights rise.
This is how you perform the deadlift correctly.
Place a (weighted) barbell on the floor. Stand with your ankles a few inches from the bar. Feet hip-width apart and slightly turned out. The bar should be above your midfoot, approximately at the level of the knot in your laces. This gives you a (bio)mechanical advantage (shorter load arm) and allows you to immediately pull the bar up the shortest possible distance, i.e. in a practically straight line.
In many instructions you will now read that you have to squat to grab the bar, but this promotes a wrong starting position, with your hips too low. It is better to bend it forward, grab the bar and only then bend your knees until your ankles touch the bar. This provides you with the best possible starting position. If you start the lift with your hips too low, they will ‘automatically’ shoot up as soon as you start pulling. That’s not efficient.
Grab the bar at shoulder width. Use an overhand grip or a hook grip. Your knees are pushing against your elbows, as it were, and your shoulders are slightly in front of the bar – not directly above it. So your arms don’t hang straight down. That has to do with the fact that not your shoulders, but your shoulder blade is directly above the bar.
Now straighten your back, raise your chest and pull the rack out of the bar, as it were. Do not move the bar and keep your hips in place. In fact you put your whole body under tension, ready to ‘explode’.
Now explosively extend your knees and hips until you are fully upright. The bar moves close to your body and your arms remain straight. Your neck and ergo head will remain aligned with the rest of your spine during the run.
Return the bar to the floor—no touch-and-go—and do the desired number of reps.
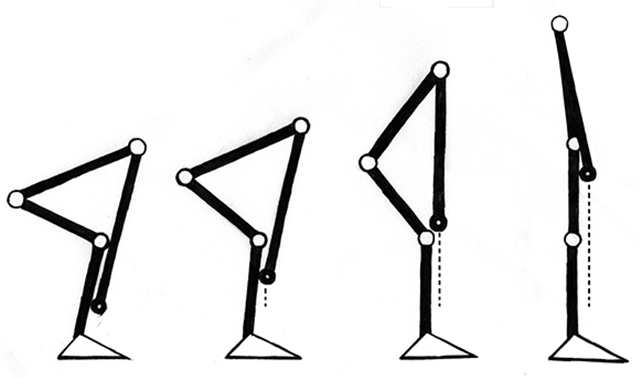 The four phases of the deadlift: starting position, pull, weight past the knees and lockout. (T Nation)
THE DEADLIFT UNRAVELED
Let’s zoom in on the different aspects of the deadlift, such as the position of your feet, the correct position of the shoulders and how the ‘lift’ actually works.
(FOOT) POSITION AND PLACEMENT OF THE BAR
In conventional deadlifts, you place your feet fairly close together, about hip-width apart. In this way you actually create space for your arms and you can grip the bar shoulder-width. This limits the distance that the bar has to travel.
You turn your feet slightly outwards to create space for your stomach. You are also at your strongest in this position. The bar is located approximately at the knot in your laces, above your midfoot. Further on, and you increase the load arm and make the exercise unnecessarily heavier. Closer, and you hit the bar with your ankles.
HANDLE
Use a normal overhand grip or a hook grip, placing your index and middle fingers over your thumb instead of vice versa.
I am not in favor of a mixed overhand/underhand grip (mixed grip). Although it gives you more grip strength, it is also dangerous. An underhand grip puts a lot of strain on your biceps. With heavy deadlifts, you run the risk of tearing your biceps with a hook grip.
HIP POSITION
A person who ‘squats’ his deadlift starts the exercise with his hips almost level with his knees. Hips, shoulders and knees form a right-angled triangle, as it were, with your back being the long side.
At the other end of the spectrum, there are those who marginalize the role of their knees by performing the deadlift almost with their knees straight. The hips are about level with the shoulders and the back is almost flat.
The correct starting position for the deadlift is with your hips about halfway between your shoulders and your knees, which together form an isosceles triangle, as it were.
 The correct starting position for the deadlift is with your hips about halfway between your shoulders and your knees, which together form an isosceles triangle, as it were. (Darwinian Medicine)
HEAD POSITION
In principle, you keep your neck straight during the performance. So don’t look up and don’t press your chin to your chest, as some preach. The position of your head in relation to your body does not change during the deadlift. When you start lifting, look at a point on the floor about three feet in front of you, and when you stand up, look straight ahead.
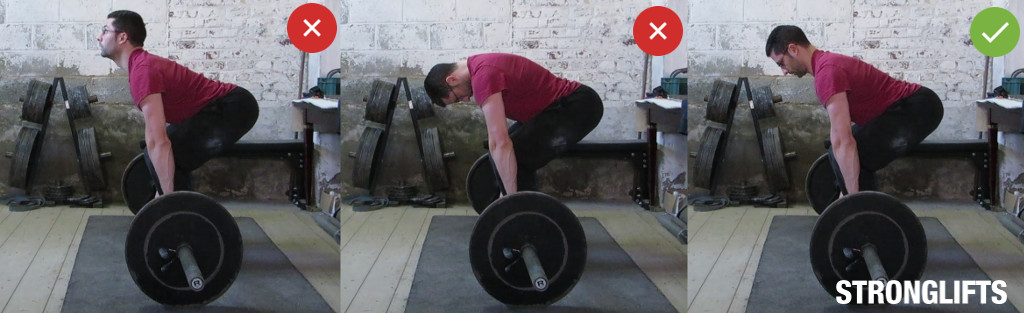 Do not look up or press your chin to your chest, as some preach. (Stronglifts)
Admittedly, we ‘just’ adopt the advice as propagated by most contemporary coaches and that also seems to us the most safe and ‘logical’. Yet there are also strong proponents of ‘chin up’ instead of ‘chin tucked’. Among them former competition powerlifter Tim Henriques. In a writing on T Nation, he argues why it is better to look up while deadlifting than to maintain a neutral head position.
SHOULDER POSITION
Your shoulder blades are in the starting position directly above the bar, so your shoulders are in front of it. You can only raise your shoulders above the bar by bending your knees, which puts your hips in too low a position. Your shoulders in front of the bar is therefore a good indication of a correct hip position.
BACK
Your back angle is the result of your knee and hip angle. So it makes little sense to say that you have to keep your back at such-and-such an angle. You do have to keep your back straight, or rather ‘neutral’ during the performance, because your lower back arches naturally. There is no point in exaggerating this natural concave and overstretching your lower back. Both the hollowing and bulging of your lower back puts a lot of pressure on your intervertebral discs, which puts you at risk of a hernia.
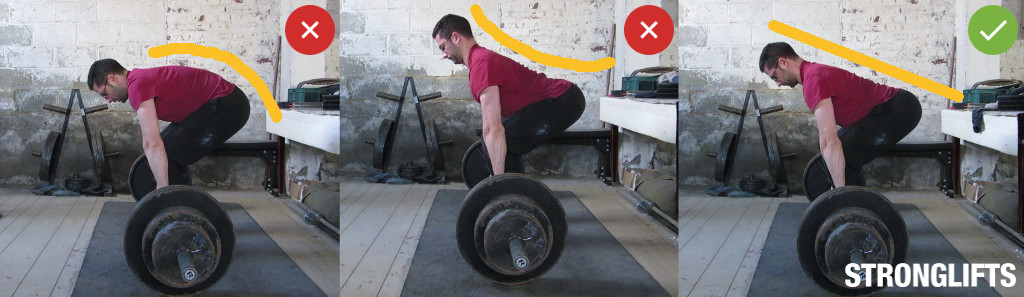 Keep your back neutral during the performance, i.e. no concave and no bulge. (Stronglifts)
So much for the set up. Now the actual elevator.
THE ‘PULL’
A barbell is flexible and there is often some play between the weight plates and the sleeves. Before you actually pull the weight off the ground, it’s best to pull the ‘rack’ out of the bar. In fact, you do this by already pulling firmly on the bar, without intending to lift it. Then explosively pull the bar up by basically stretching out as fast as you can. I always like to think of myself as a compressed coil that is released. The bar stays as close to your body as possible and follows an almost straight line.
LOCKOUT
I see people doing strange things during the deadlift lockout. From leaning back to excessive arching of the lower back and excessive contraction of the shoulder blades. None of that is necessary; ‘Just’ standing up straight, with knees and hips straight, is enough to get three white lights in a powerlifting competition.
During your workout, or during a competition when you’re on a show-off, after your last rep, you can hold the bar for as long as possible to improve your grip strength. Make sure that you still have enough power to lower the weight in a controlled manner.
PUT BACK
The negative phase of the deadlift, in which you move the bar back to the floor, is more or less the mirror image of the positive phase, the lift. As with lifting, when lowering, the bar should move in a vertical line, as close to your body as possible, just in front of your legs. Vertical is the shortest way down and the safest for your lower back. You should then land the barbell over your midfoot again, the starting position for your next rep. Your shoulder blade is then directly above the bar and your shoulders slightly in front of it.
From the knees up, the deadlift is a pure hip exercise, which means moving your hips backwards as you lower. And that’s where things often go wrong. Instead of a ‘hip hinge’ movement, one immediately drops to the knees (as if it were a squat).
How to do it then:
- The negative phase of the deadlift begins with unlocking your knees and hips. After all, in the lock-out they have to be stretched (without leaning back, your lower back arching excessively, or whatever);
- Lower the bar by moving your hips back. So don’t drop to your knees right away! Try to imagine someone standing behind you with a rope around your waist and pulling it back as you lower the weight;
- Do not bend your knees until the bar is just past it;
- Hold the bar close to your body and lower it to the starting position, over the middle of your feet.
Also note here:
- Lower the barbell in a controlled manner, but not overly slowly. The deadlift is not an exercise for slow negatives; that would be too taxing on your back. In principle, lowering is slightly faster than lifting;
- Be sure not to drop the barbell. For optimal muscle growth, you should perform the full range of motion (ROM) and not drop the weight prematurely. If you feel that urge, you may be deadlifting too hard;
- Keep your back in a neutral position throughout the negative phase: straight, with a small, natural curve in your lower back. So no unnatural concave and certainly no curvature.
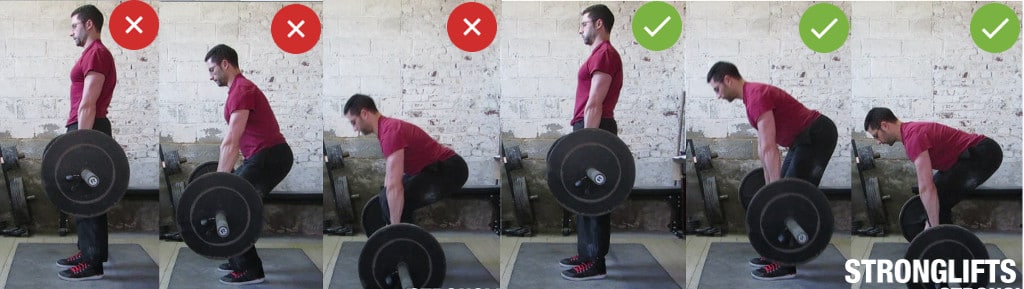 The negative phase of the deadlift: Back with those hips! (Stronglifts)
BREATHING
With the deadlift, as with the squat, it is important to create intra-abdominal pressure to support your spine. In fact, you do this by taking a deep breath and tightening your abs. A dumbbell belt can help you with this.
Basically, you hold your breath for the entire rep. So during the upward and downward phase, but at least during the lifting of the weight. So do not ‘deflate’ slowly on the way up and preferably only exhale again when you have placed the weight back on the floor. When you take a deep breath, you basically have enough oxygen to complete one repetition.
Finally, everything is summarized in a solid demonstration video.
IS THE DEADLIFT DANGEROUS?
That depends on what you mean by ‘dangerous’.
Of the three competition parts in powerlifting, the deadlift is the safest, in the sense that you don’t need spotters. Unlike the squat and bench press, you can never get pinched and it is also practically impossible to drop the weight on your feet. That in itself is a safe feeling. If you can’t complete a rep, lower or even drop the weight again. The only thing left for you is a bruised ego.
By “dangerous,” however, most mean that the deadlift would be unsafe for your lower back. The exercise itself is not dangerous for your lower back, but an incorrect execution is. Rounding your lower back and ‘lifting your back’ are things that increase the risk of injury. However, if you start light and pay close attention to your technique, the deadlift will eventually prevent more injuries than it causes.
DEADLIFT VARIANTS
There are many variations on the ‘regular’ deadlift. The best known:
- sumo deadlift – Deadlift performed with a wide, so-called ‘sumo’ foot position. Shorten the range of motion and increase hip engagement, while relieving some strain on the lower back. Many powerlifters prefer this style.
- stiff-legged deadlift – Deadlift with almost straight legs and therefore without significant bend in the knee joint, which disables the quadriceps.
- Romanian deadlift – Named after the Romanian weightlifters who “invented” it, this deadlift doesn’t start with the weight on the floor. From a standing position, lower a weighted barbell to below your knees, after which you come back up.
- rack/block pulls – deadlift where you lift the weight from an elevation – for example the safety bars in a power rack. In fact meant for training your lockout specifically.
- deficit deadlift – deadlift in which you are on a rise and thus in effect increase the range of motion. Can be performed with knees extended or bent. The first is in fact an extreme variant of the stiff-legged deadlift, the second an auxiliary exercise if you especially have trouble with the lower half of the movement.
- snatch-grip deadlift – Deadlift with a very wide grip, with your pinkies against the outer rings on the bar. In fact, this allows you to increase the range of motion without aids, train your legs and – through the grip – your traps and upper back.
- hex/trap bar deadlift – deadlift performed with a so-called hex, or trap bar, which allows you to grip the bar on either side of your body with a neutral grip. This execution is more like a reverse squat.
- dumbbell deadlift – deadlift with dumbbells instead of a barbell.
TRAINING THE DEADLIFT
The best way to train the deadlift is by deadlifting and by integrating various deadlift variants into your training program.
Good auxiliary exercises for the deadlift are kettlebell swings and (seated) box jumps for the necessary explosiveness, glute bridges and hip thrusts for strong glutes and hips, stiff-leg deadlifts, good mornings and hamstring curls for strong hamstrings, plus the ‘regular’ work for a strong upper back. And don’t forget squats. Squats are arguably the most important auxiliary exercise for deadlifts, as they work the same muscles. (I once saw my deadlift shoot up to 20kg after 13 weeks of ‘Smolov’, a Russian squat program where you don’t deadlift once.)
I usually squat twice a week and deadlift a maximum of once a week and rarely do more than five reps per set. You can safely deadlift more than once a week, but then you have to limit the volume per workout. My deadlift training consists mainly of heavy doubles and triples, and the occasional single. I do the latter in moderation, because nothing is as hard as a maximum attempt on the deadlift. I do, however, do more singles with a sub-maximal weight, to improve my technique.
As far as the deadlift is concerned, but that is my opinion, you should also not use intensity techniques such as drop sets. Don’t complicate your deadlift training. Lifting twice your body weight off the ground is hard enough.
Besides. One of the toughest workouts I’ve ever done is the ‘half-hour deadlift challenge’, where you do a double (two reps) to the minute for 30 minutes with (at least) 140 kg. (I used 155 kg.) You can also do a single every half minute, but I found that less practical. An ideal way to train the deadlift voluminously, without high numbers of repetitions per set! Give it a try. After 20 minutes it really gets ‘fun’!