Messing up your deadlift is the quickest way to a worn back — if you don’t get an acute injury already. In addition, it undermines the effectiveness of the exercise. Nine common deadlift mistakes that you should definitely avoid.
1. STAND TOO FAR FROM THE BAR
A well-executed deadlift stands or falls, like all basic exercises, with proper preparation, or set-up. The set-up for the deadlift is all the more important because you basically have to think of each rep as a set, between which you return to your starting position.
Lifting weights is a matter of levers and that certainly applies to the deadlift. Positioning the bar too far from your shins will lengthen the load arm unnecessarily and reduce the weight you can lift. You want the bar to be as close to the center of gravity as possible, which is in the case of the deadlift above your midfoot. This way you can pull the bar up in an almost straight line. If you place the bar too far away from you, it will automatically find the center of gravity as soon as you start lifting and you risk losing your balance.
 Place the bar as close to your shins as possible, above the midfoot. This way you can pull the bar up in an almost straight line. (Stronglifts)
2. TOO WIDE STANCE/GRIP
Two rookie mistakes are too wide a stance and (therefore) too wide grip. Place your feet about shoulder width under the barbell, about where your (imaginary) laces are tied. Your shins are about an inch from the bar. Without bending your knees, grab the bar on the outside of your legs, slightly wider than shoulder width. Only now bend your knees slightly forward (duh, you can’t go back) until they touch the bar.
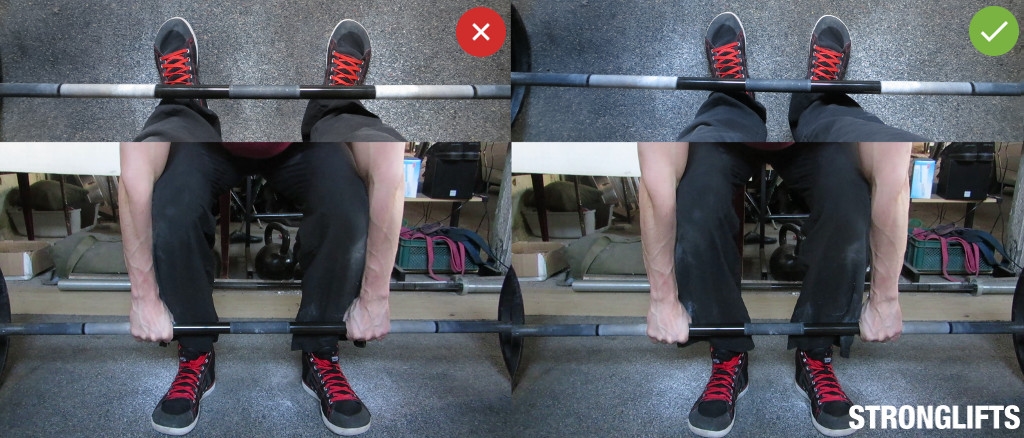 In conventional deadlifts, you place your feet fairly close together, about hip-width apart. In this way you actually create space for your arms and you can grip the bar shoulder-width. This limits the distance that the bar has to travel. ( Stronglifts )
3. HIP POSITION TOO LOW
The deadlift is sometimes referred to as a “reverse” squat. That’s understandable, but not quite right. The deadlift and the squat have many similarities, but also at least as many differences. The deadlift is a hip dominant exercise and the squat is a knee dominant exercise. Remember, the squat raises are mainly done by straightening your knees, the deadlift is done by straightening your hips.
By preparing in the way described above (by first grasping the bar and then bending your knees) you also prevent one of the biggest execution mistakes in the deadlift, namely a hip position that is too low. Your hips should be well above your knees: your lower and thigh angles are at least greater than 90 degrees, similar to a quarter quat. We see too many people starting the deadlift with knees and hips at the same height (as in a parallel, or half squat), the more or less logical consequence of over-comparing the deadlift with the squat.
 Right: squatting your deadlift. The correct starting position on the left. (Barbell Rehab)
The irony is that the people who deadlift from a parallel squat position, lifting the weight off the floor still puts their hips (and shoulders – think about that) in the correct position where they were already in the first place. A matter of logic and mechanics; after all, your quarter squat is stronger than your parallel squat, right? Prevent this unnecessary hip movement by bringing and keeping your hips in the correct position from the start.
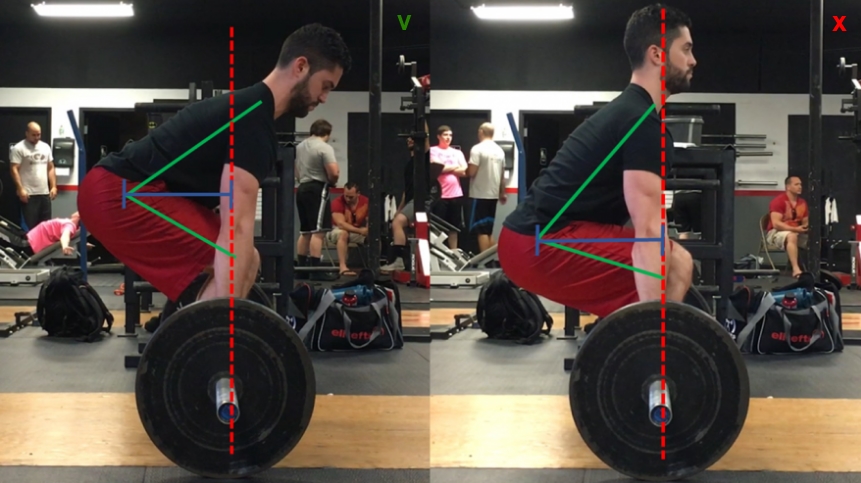
Imagine your starting position as an equilateral triangle, with knees and shoulders at the vertices of a vertical line; your butt is on the third (right) corner.
 The correct starting position for the deadlift is with your hips about halfway between your shoulders and your knees, which together form an isosceles triangle. (Darwinian Medicine)
4. MOVING THE BAR
The set-up revolves around positioning yourself correctly in relation to the bar, not vice versa. In this respect, and only in this respect, see the bar as an immovable object. Don’t waste your careful preparation by moving the bar. That would be like taking a different position relative to the bar. Relativity, you know?
5. STILL MOVING HIPS
We have already reached error number five and the bar is not yet off the ground. That just goes to show that preparation is the most important part of the deadlift. The correct implementation is the more or less logical consequence of a correct set-up.
You are now almost ready to pull the weight off the ground. The only thing left to do, or better not to do, is to bring your hips towards the floor, as if you were going to lift the weight off the floor in a kind of reverse squat. As mentioned, this has no added value; once you really start lifting, the hips will rise again until the shoulders are approximately above the bar. If it were up to us, we’d hold a skewer under your bum while deadlifting. See if you also move your hips downwards. We suspect not.
Rather than moving your hips downward, just before you pull, straighten your chest to straighten your back. Now you are finally ready to pull the weight off the ground, which is really just a matter of straightening your legs by straightening knees and hips. Pull the weight up your body – yes, we said ‘along’ – and lock your hips. Lower the weight along the same line and do any reps the same way you did that first, flawless rep.
6. NOT PULLING THE SLACK OUT OF THE BAR
With conventional weight plates there is always some play between the bar and the plates. In addition, the barbell itself is flexible. This is even more true for special deadlift bars, which are more flexible than regular barbell bars. Before you start your actual deadlift, you’ll want to take that slack and bend out of the bar by tensioning your arms and lifting your chest. In fact, you are already pulling the bar, but only so hard that it just doesn’t come off the ground. If you don’t, you will experience no resistance for a split second as soon as you start pulling and that will be at the expense of your muscle tone.
You can see what we mean in the videos below. In the first clip the bar is lifted directly, in the second (the correct shape) the slack is first pulled out of the bar.
7. INADEQUATE LEG INVOLVEMENT
Although you should not start your deadlift with your hips too low (see point 3), you should certainly not perform the deadlift with almost straight legs. Your quadriceps play an important role in the first phase of the deadlift, until the bar has passed your knees. With your knees straight you put your quads out of play and make the exercise unnecessarily taxing on your lower back.
8. WRONG LOCKOUT
In a powerlifting competition, your hips—in fact your entire body—must be fully extended or there will be no valid lift. If you don’t, you put undue stress on your spine and may not be using your deadlift’s full potential — even if you keep your hips minimally articulated. You can prevent this by pushing your hips forward during the lift, as explained in the video below.
Some see this as a reason to overextend their lower back during the lock-out (‘hyperextension’), which is completely unnecessary and also increases the risk of injury. In fact, you should keep your spine in a neutral, ie “straight” position throughout the exercise. Your back stretcher (erector spinae) is therefore only trained isometrically during the deadlift.
9. BAD DESCENT
The negative phase of the deadlift, in which you move the bar back to the floor, is more or less the mirror image of the positive phase, the lift. As with lifting, when lowering, the bar should move in a vertical line, as close to your body as possible, just in front of your legs. Vertical is the shortest way down and the safest for your lower back. You should then land the barbell over your midfoot again, the starting position for your next rep. Your shoulder blade is then directly above the bar and your shoulders slightly in front of it.
From the knees up, the deadlift is a pure hip exercise. This means that when lifting, you should focus on bringing your hips forward, rather than just pulling the bar up. The negative phase is more or less opposite to the positive, which means that when lowering you have to move your hips backwards. And that’s where things often go wrong. Instead of a ‘hip hinge’ movement, one immediately drops to the knees (as if it were a squat), which can then look like this:
Note that the bar cannot go down completely vertically, otherwise it will bump into the knees. As a result, it becomes part of the body, resulting in unnecessary (and potentially dangerous) strain on the lower back. In addition, this comes at the expense of tension on the glutes and hamstrings, two of the target muscles of the deadlift.
How to do it then:
- The negative phase of the deadlift begins with unlocking your knees and hips. After all, in the lock-out they have to be stretched (without leaning back, your lower back arching excessively, or whatever);
- Lower the bar by moving your hips back. So don’t drop to your knees right away! Try to imagine someone standing behind you with a rope around your waist and pulling it back as you lower the weight;
- Do not bend your knees until the bar is just past it;
- Hold the bar close to your body and lower it to the starting position, over the middle of your feet.
Additional points of attention:
- Lower the barbell in a controlled manner, but not overly slowly. The deadlift is not an exercise for slow negatives; that would be too taxing on your back. In principle, lowering is slightly faster than lifting;
- Be sure not to drop the barbell. For optimal muscle growth, you should perform the full range of motion (ROM) and not drop the weight prematurely. If you feel that urge, you may be deadlifting too hard;
- Keep your back in a neutral position throughout the negative phase: straight, with a small, natural curve in your lower back. So no unnatural concave and certainly no curvature.
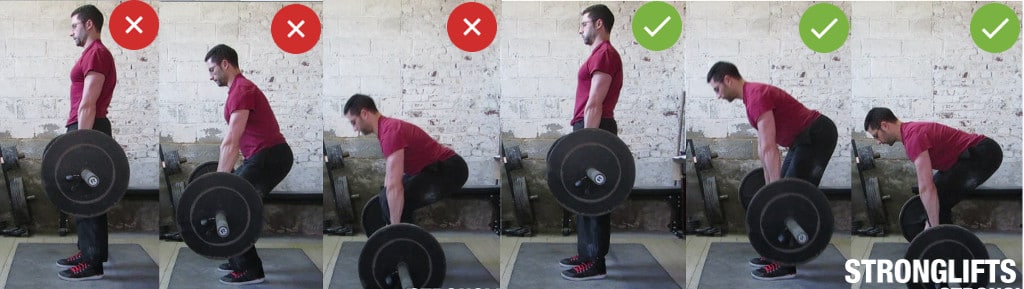 The negative phase of the deadlift: back with those hips! (Stronglifts)
Tip: you can only detect many of these implementation errors by filming yourself from the side with, for example, your smartphone.
FINALLY
There is nothing that breaks as quickly as the correct technique when performing the deadlift. Therefore, partly, but not exclusively, limit your number of repetitions. Your back will thank you. Just as grateful as you are to us for this article. You’re welcome.