It’s the ultimate test of strength: the deadlift. Everyone is looking for little tweaks to improve their deadlift. While everyone has their own style, depending on someone’s anatomical proportions, there are some universal laws that seem to apply to practically everyone. What follows are fourteen of them.
Note that most of the tips apply to the conventional deadlift, not the sumo deadlift.
1. DEADLIFT IN POWERLIFTING SHOES
Many coaches and trainers will advise you to squat barefoot or in socks. We, on the other hand, recommend that you deadlift in powerlifting shoes, not to be confused with weightlifting shoes. Powerlifting shoes may have a raised heel, but they are much less high than weightlifting shoes. It is precisely this raised heel and higher heel position that allows you to transfer your weight backwards, without the tendency to fall backwards.
Deadlifts in powerlifting shoes help you, in our opinion, to make optimum use of your quadriceps on the one hand and your glutes and hamstrings on the other. The fact that deadlifts in powerlifting shoes slightly reduce your range of motion (ROM), or the distance over which you have to pull the weight up, is a negligible disadvantage in our opinion.
2. CHOOSE A NARROW FOOT POSITION
The correct foot position on the conventional deadlift is actually quite narrow – narrower than your position on the squat, for example. Looking down, your feet should be well within the middle smooth portion of the bar so you can handle the correct grip width. A stance that is too wide for the deadlift also forces your knees into the valgus stance.
The dumbbell is in the starting position almost against your shins (see also point 3). Let your feet point out slightly.
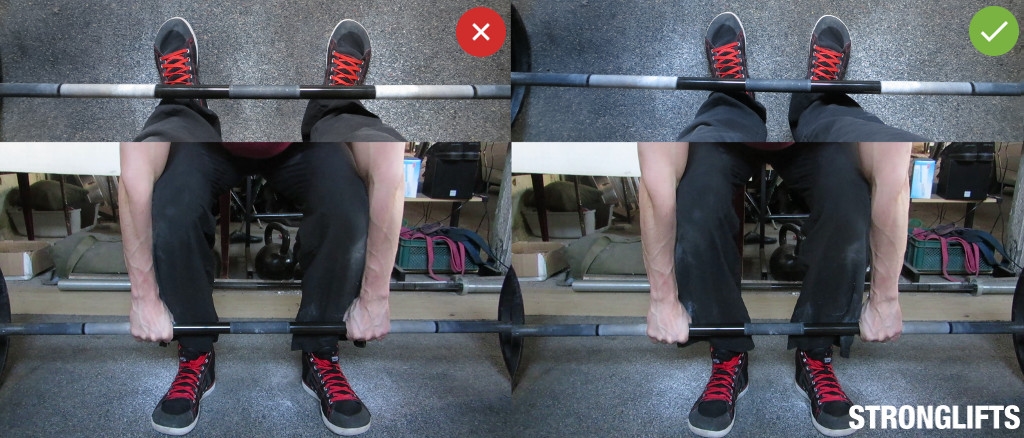 In conventional deadlifts, you place your feet fairly close together, about hip-width apart. In this way you actually create space for your arms and you can grip the bar shoulder-width. This limits the distance that the rod has to travel. (Stronglifts)
3. PUT THE BAR AGAINST YOUR SHINS
Lifting weights is a matter of levers and that certainly applies to the deadlift. Positioning the bar too far from your shins will lengthen the load arm unnecessarily and reduce the weight you can lift. You want the bar to be as close to the center of gravity as possible, which is in the case of the deadlift above your midfoot. If you place the bar too far away from you, it will automatically find the center of gravity as soon as you start lifting and you risk losing your balance. As a result, you have to compensate with your lower back. So place the bar as close to your shins as possible. This way you can pull the bar up in an almost straight line.
The foregoing also means that the barbell goes close to your body during the movement and may even touch your legs. The latter is not a must and perhaps not practical, but the essence is that the bar is in constant contact with your body.
4. KEEP YOUR SHOULDERS IN FRONT OF THE BAR
Your shoulders should be in front of – or should we say ‘over’? – the barbell bar is in the deadlift starting position so that your shoulder blade is above the bar. This provides you with the strongest possible starting position. This actually has to do with the attachment of your latissimus dorsi muscle (‘lats’), which is responsible for various movements in the shoulder blade. That should therefore be directly above your center of gravity, ie directly above the bar.
 In the starting position, the shoulder blade is directly above the bar. (T Nation)
5. THE HIPS: NOT TOO LOW, NOT TOO HIGH
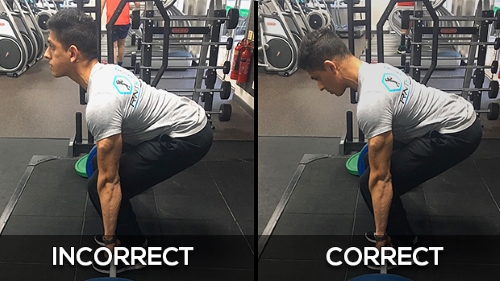
When you ‘squat’ your deadlift, your hips are not only too low, but also too far away from the bar. This results in an unnecessarily long load arm. This not only makes it more difficult to lift the weight off the floor, but also puts an unnecessary burden on the lumbar spine, or your lower back. With your hips higher, you decrease the (horizontal) distance to the bar and thus also the load arm, which puts you in a stronger position and also protects your lower back.
If you analyze an incorrectly set up deadlift, i.e. with the hips too low, you will see the same thing happen over and over: the moment the bar is pulled off the ground, the hips shoot up to the ideal starting position. That is, the position they should have been in before you started pulling. By this ‘shooting up’, you lose muscle tension and you perform the exercise sub-optimally.
However, you should also not position your hips too high. This happens when your shoulder blade positions over the bar, rather than directly above it (see point 3). Hips placed too high in the starting position is also a common deadlift mistake, which can have several causes. YouTube oracle Omar Isuf elaborates on this in the video below.
No one deadlifts the same, so the exact hip position at the start will be different for everyone. But take as a guide: somewhere in the middle between knees and shoulders.
 The correct starting position for the deadlift is with your hips about halfway between your shoulders and your knees, which together form an isosceles triangle. (Darwinian Medicine)
6. KEEP YOUR ARMS STRAIGHT
Keep your arms straight throughout the movement. Not that they hang completely straight down: your shoulders are not directly above the bar, we just saw, so that your arms point slightly backwards. But we mean your elbows shouldn’t be bent. Not lightly either. Not only are you less strong, you also run a higher risk of injuries.
7. KEEP YOUR HEAD IN A NEUTRAL POSITION
You may have a tendency to look straight ahead or even up during the deadlift. As a result, you bend or straighten your neck, which is at the expense of a neutral spine. Therefore, keep your head neutral, that is, look at a point on the floor in front of you so that your neck remains in line with your spine.
 Look at a point on the floor in front of you. (T Nation)
8. PUT TENSION ON THE BAR
Many people jerk the weight up when deadlifting. Although you do have to explosively pull the weight up, you must first make sure that there is no play between the bar and the bore of the weight plates and that you are pulling the rack out of the bar. In short: you have to put tension on the bar before the actual lift-off. In fact, think of the bar as an immovable object and use it to put yourself under tension. You can’t fire the bow without cocking it first.
9. PUSH THE FLOOR AWAY
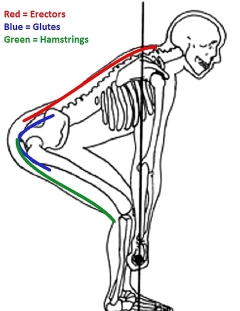
You’ve probably heard the following tip for the bench press: don’t push the bar away from your body, but push yourself away from the bar. That same tip more or less applies to the deadlift as well. Instead of lifting the bar up, you should try to push the soil away. This changed perspective on the exercise encourages proper technique and helps you activate your glutes and hamstrings, the most important muscles in the exercise.
10. ACTIVATE YOUR LATS
Your latissimus dorsi (“lats”) muscle, or broad back muscle, plays a key role in stabilizing your upper body on the deadlift. We always give people two tips to activate their lats during the deadlift. The first is: Do a lat isolation exercise like straight-arm pulldowns. The second is: clamp a few tennis balls under your armpits while deadlifting. Nothing teaches you to involve your lats in the exercise better than that.
11. SQUEEZE THE BAR
It’s important in almost every exercise to try and squeeze the juice from the bar, so to speak, but with the deadlift, grip is a crucial and limiting factor in how much weight you can lift. The easiest way to work on your deadlift grip is to use a double overhand grip, or double overhand grip, for as long as possible before switching to a mixed grip or using lifting straps. Another way is to hold the bar for as long as you can after your last rep, like powerlifter Konstantīns Konstantinovs does.
12. BRING YOUR HIPS FORWARD WHEN LIFTING
From the knees up, the deadlift is a pure hip exercise. It is good to remember this as soon as the bar passes the knees. Otherwise, you tend to lift with your lower back. So focus on bringing your hips forward, rather than just pulling the bar up. At the lock-out, try to aggressively push the bar away with your hips. In the deadlift final position, your buttocks should be so tight that you can crack a walnut between them. A good way to activate your glutes for a deadlift session is to do some light glute bridges and hip thrusts.
 Push your body forward with your buttocks. (source: YouTube: CanditoTrainingHQ )
13. DON’T LEAN BACK ON THE PEAK
Just because you have to bring your hips forward doesn’t mean you have to lean back on the peak of the deadlift. As you can see in the gif above, you ‘just’ stand upright, with your knees and hips locked, without arching your lower back. The latter is just as bad for your lower back as deadlifts with a round lower back!
By not leaning back, we also mean not to roll your shoulders back, another common mistake in this phase of the deadlift.
14. BRING YOUR HIPS BACK WHEN LOWERING
The negative phase of the deadlift, in which you move the bar back to the floor, is more or less the mirror image of the positive phase, the lift. As with lifting, when lowering, the bar should move in a vertical line, as close to your body as possible, just in front of your legs. Vertical is the shortest way down and the safest for your lower back. You should then land the barbell over your midfoot again, the starting position for your next rep. Your shoulder blade is then directly above the bar and your shoulders slightly in front of it.
‘Mirror image’ also means that when lowering you have to move your hips backwards, where you brought them forward when lifting (see 12). Often things go wrong at this point. Instead of a ‘hip hinge’ movement, one immediately drops to the knees (as if it were a squat), which can then look like this:
Note that the bar cannot go down completely vertically, otherwise it will bump into the knees. As a result, she becomes part of the body, resulting in unnecessary (and potentially dangerous) strain on the lower back. In addition, this comes at the expense of tension on the glutes and hamstrings, two of the target muscles of the deadlift.
Lower the bar by moving your hips back. So don’t drop to your knees right away! Try to imagine someone standing behind you with a rope around your waist and pulling it back as you lower the weight. Do not bend your knees until the bar is just past them. So like this:
FINALLY
Don’t think of the deadlift as “just” jerking a heavy weight off the floor. Think of the deadlift as a technical exercise, like the snatch or clean and jerk in weightlifting. Pay attention to your technique and your deadlift will definitely improve!